| Posted: 30 January 2015 at 11:20pm | IP Logged | 12
|
post reply
|
|
This is a continuation of the Copic marker discussion from the other thread. The experiments are to determine where Copic marker tone begins to stack. I.e., when N1 + N1 does not equal N1 so you can control when or if the tone builds up.
I conducted some additional experiments on the working time of Copic Markers. (see below)
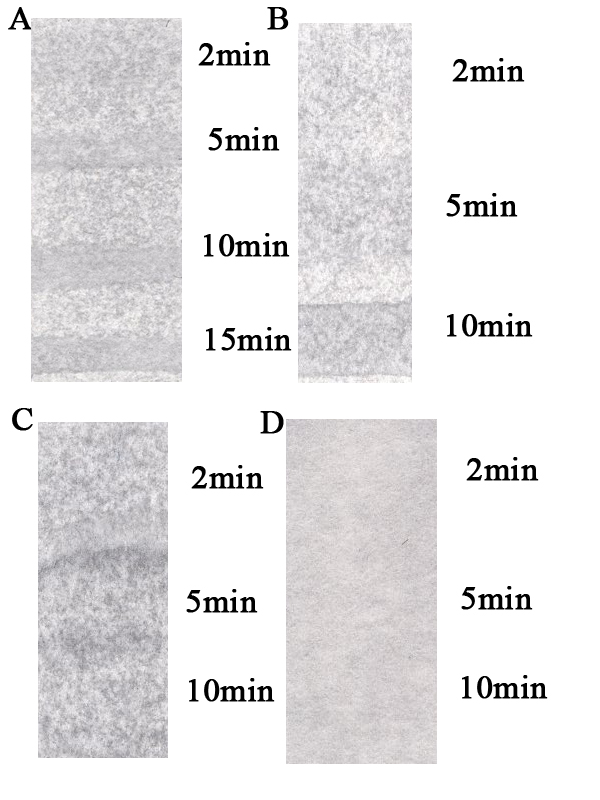
Pen used: Copic 0 and N1 on Strathmore 500 series illustration board. These are all straight out of the scanner (Epson GT-20000) at 300dpi, full color scan. (Descriptions below the image)
Test A) This is the same one from the other thread, dry paper, no blender. There's seems to be 2+ minutes of safe working time here, 5 if you aren't overly concerned about how contiguous the tone is (i.e., if you were putting it down mottled, you probably won't notice any difference).
Test B) This has 0 colorless blender put down first, then N1 put down at 2,5 and 10 minutes. Interestingly, you do get a bit more working time if you do this. Also interestingly, at 10 minutes the N1 application seems to go dense at the edges!
Test C) Same as above, but there was an attempt to "revitalize" the ink by adding blender before the final application. This almost works. The tone laid down this way seems of the same value as the initial tone, but there are noticeable bleeding affects, but they are quite blurry and, well, that's gotta be useable for something. :)
Test D) This is the same as above, except that 0 blender is added continuously over the whole surface every minute or so to keep it wet. Not surprisingly, you get a very "blended" look, and there is no hint of tone stacking at all. This could be very worth knowing if you plan on toning larger real-estate, particularly any sort of base-tone.
Anyway, hope that's useful to someone!
Might be interesting to try this with color Copics, but I don't have any.
|